Review: Hyperlite Mountain Gear Ultamid 4

(Disclaimer: Below list contains affiliate links, which means I get a small commission for purchases made through the links. The gear is bought with my own money though and I have not been asked to review the gear.)

Hyperlite Mountain Gear Ultamid 4 at Fulufjället National park

I’m going to give a review of my Hyperlite Mountain Gear 4, with the full- and the half inner and go through my likes and dislikes with it. While it’s a great tent, it still has its downsides. I’ve owned the tent for a little less than a year, and used it both below and above the treeline and I have used a lot of different tents before this one.

For those who don’t know, the HMG Ultamid is made out of Dyneema composite fabric, formerly known as Cuben Fiber. The material was originally made to make sails for sail racing boats, but have been widely used by parts of the outdoor business. The pros, as opposed to sil nylon which is the standard material used in tents, is that it is both lighter and stronger. It doesn’t stretch, sag when wet or soak, and is easier to just shake or wipe off moisture. The cons however is that it is less resistant to abrasions and folding. I’ve read that you can expect almost twice the amounts of nights a Sil tent will take before worn out, compared to a DCF tent since the material will wear quicker. Another downside is price. The material itself is expensive, thus making the gear expensive.

I’ve owned gear from Hyperlite Mountain Gear since 2017, and before the Ultamid 4 I had the Ultamid 2. I have the backpack Southwest 4400, pack pods and a stuff sack pillow, and I’m generally happy with the gear I have from them. I’ve used a lot of tent before; Bergans Compact tunnel tent, Hilleberg Enan, Niak and Staika, Luxe Sil Hex Peak, Twin Peak and Tentipi Olivin Light, Olivin BP and Safir 5 BP. My reason for buying the Ultamid 4 was to have one tent that was light enough for solo use, but still large enough for family camping.

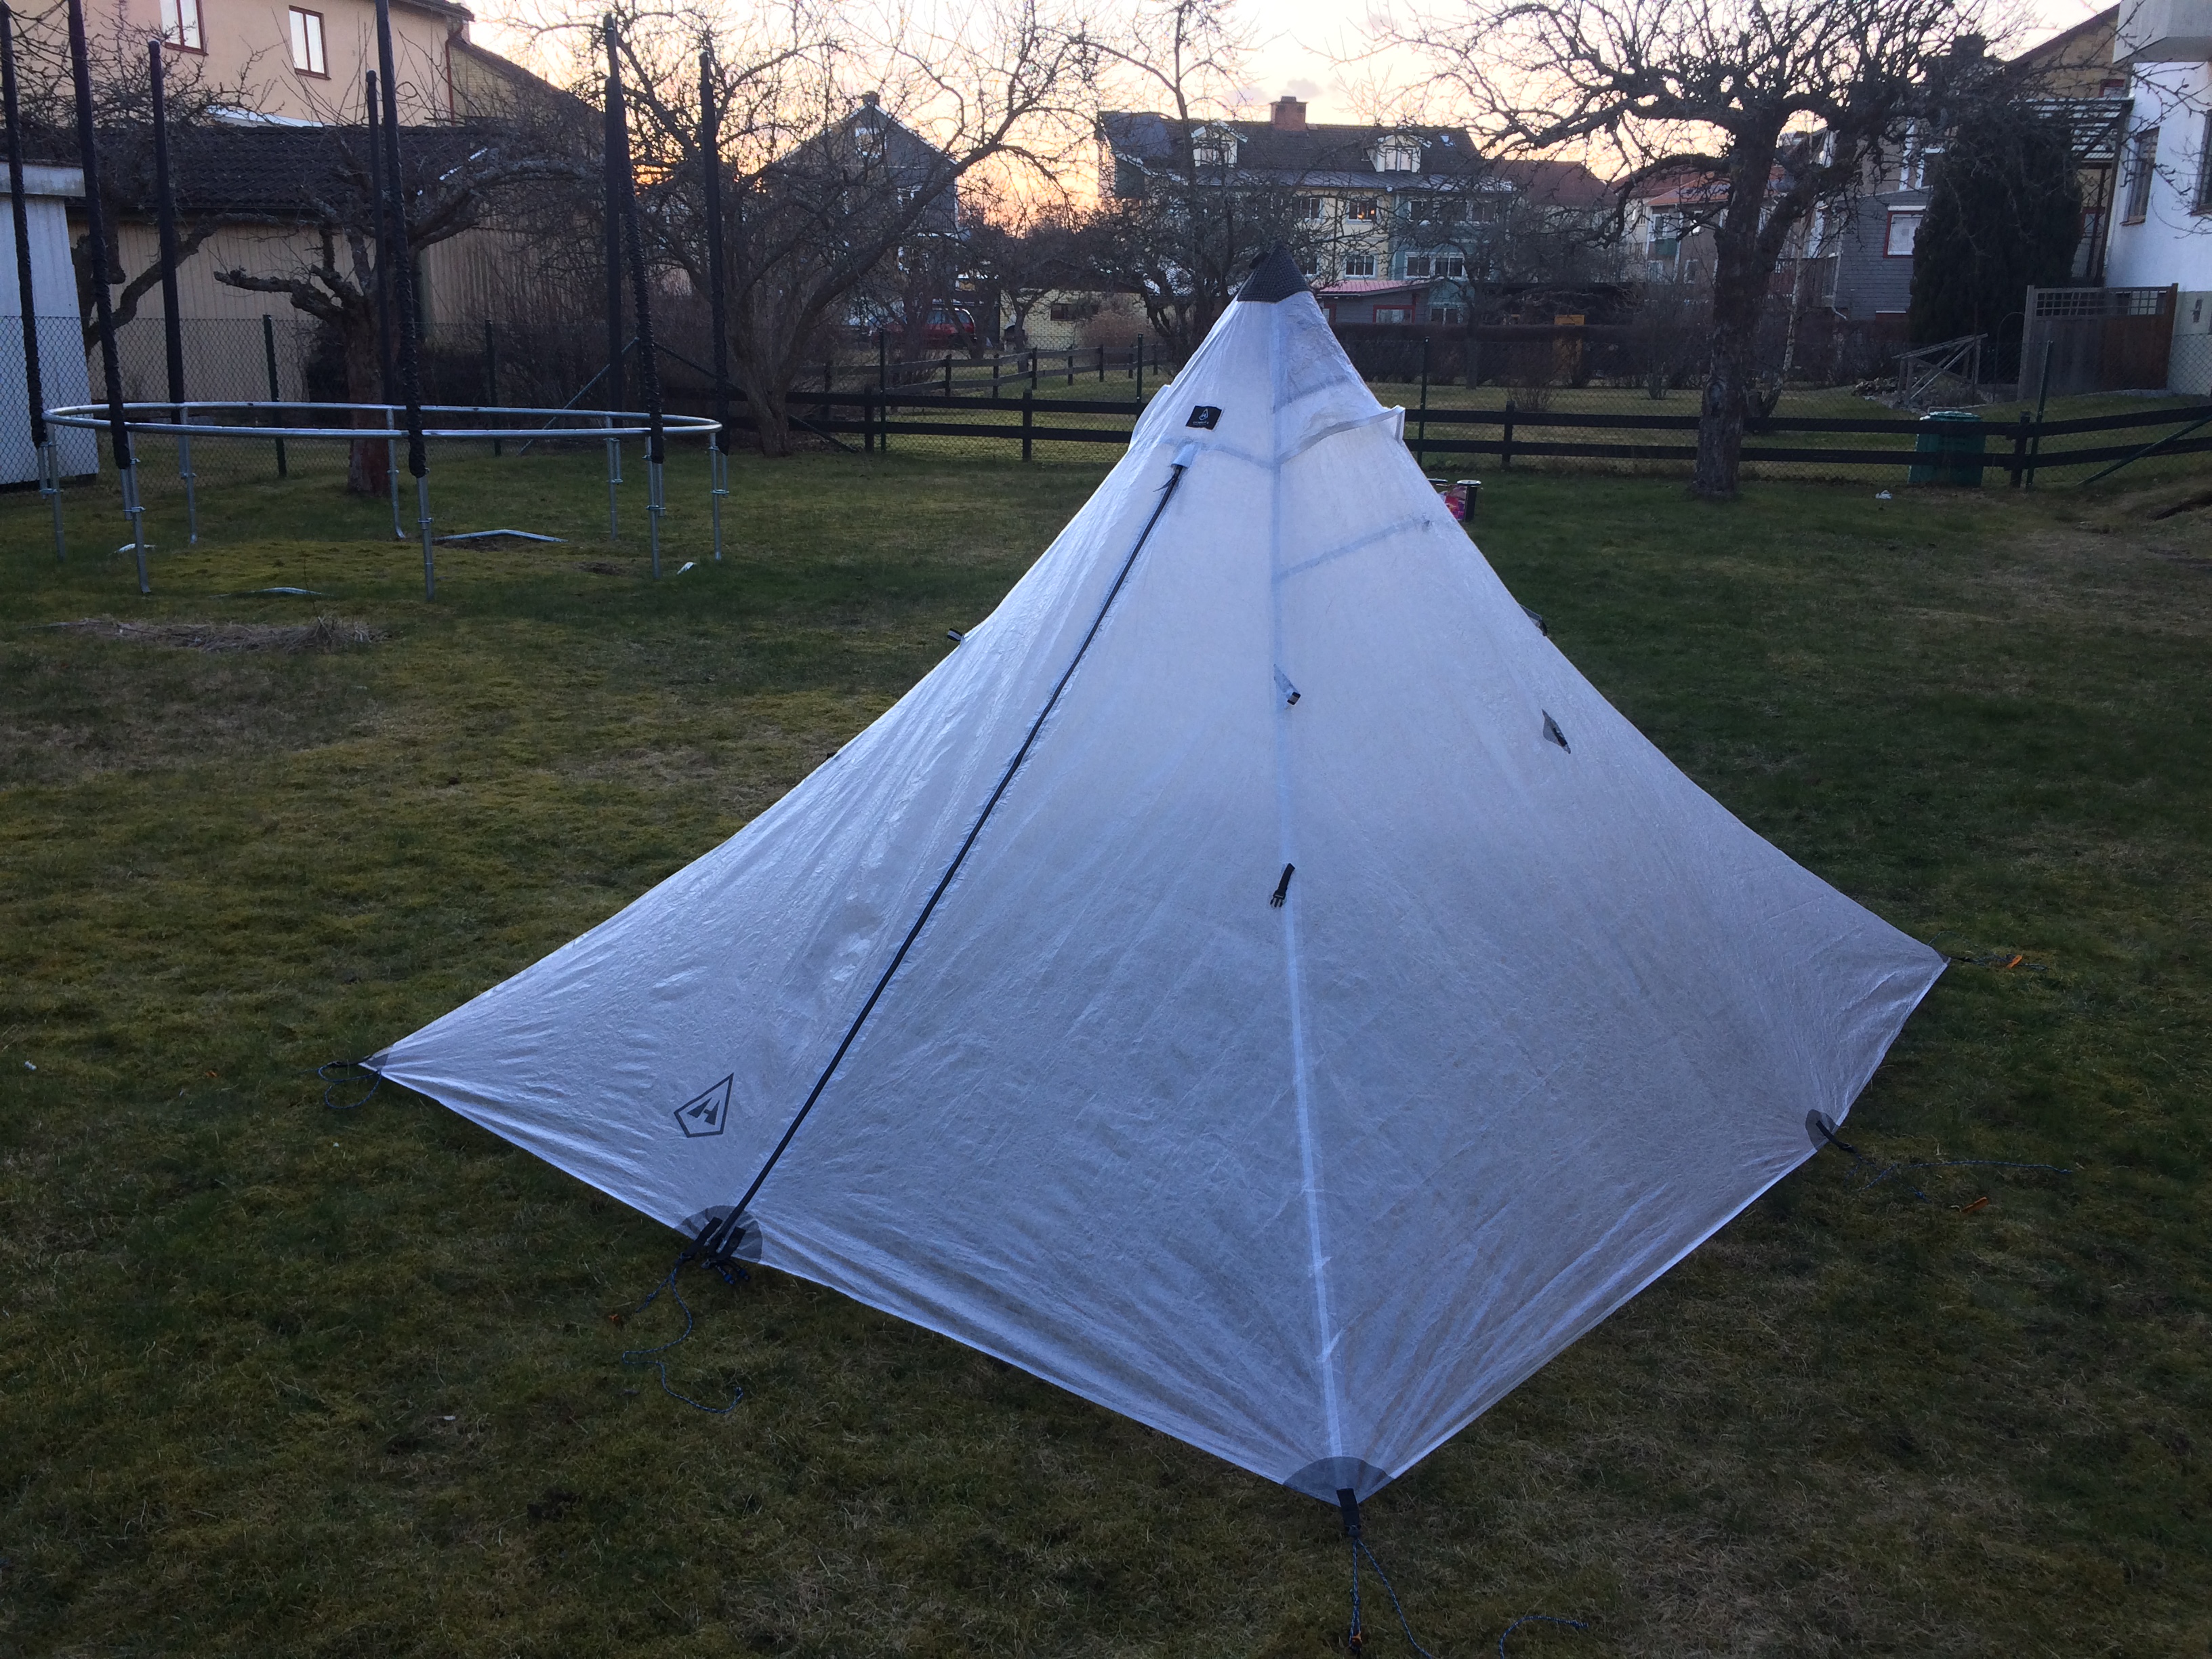
The Ultamid is a so called Mid, or Pyramid shelter. It’s easily erected. Lay it on the ground, put the pegs in the corners and make sure the corners are in a 90⁰ angle. I also recommend securing one guy line to a backpack too, to mitigate the risk of it blowing away while you are setting it up or taking it down.

Insert the center pole and adjust the guy lines. Tighten them a little bit at each corner to get even tension and then go around again and tighten them some more if necessary. The half inner gets secured to the fly with hooks, and with pegs in the corners, and then secured to the top with a carabiner.

The tent, with the material and shape, is made to withstand much of what nature can throw at it. I don’t know how many times I’ve heard or read ‘bombproof’ in tent reviews, and while I don’t plan to do any camping in the conflict areas of Syria any time soon, it do tell some about whats expected of it.

Pegging out the full inner before adding the fly. The inner can be left attached to the fly to set up both at the same time

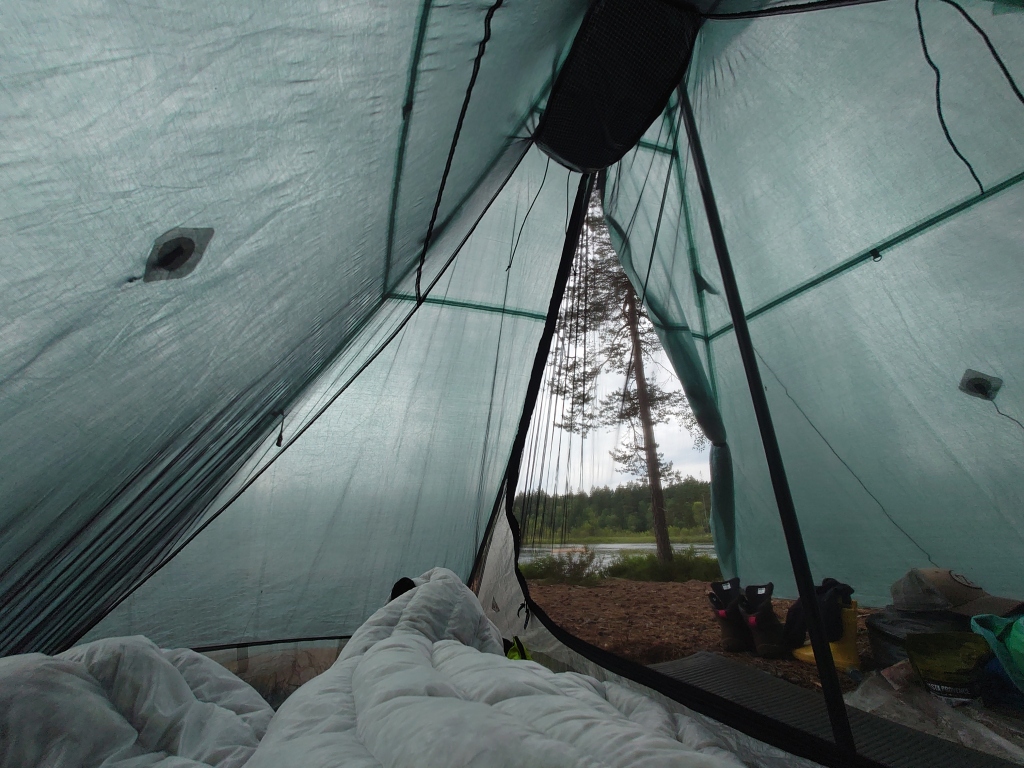
So whats my impression of it then? I’ve had both the Ultamid 4 and the 2 on both low land trails and in the mountains above the treeline. And it do handle wind very well. Despite not having a solid inner it doesn’t get particularly breezy inside, even in hard wind. When it comes to quality it’s OK. It’s not Hilleberg quality, and while I didn’t have any issues with the 2, I had water seeping through the seams and dropping down in my face at night in the Ultamid 4. HMG refunded the shipping cost and sent me a few meters of DCF tape, and I taped up the weak spots. One area in the top was supposed to be covered with tape, but the tape there didn’t cover the seams. This made it possible for water to seep through, and on two trips I frequently had water dropping down on my face at night. I have a lot of other gear from HMG, and I had the Ultamid 2 without any issues, so I could have just gotten a bad one, since it was made when HMG where overwhelmed with orders during peak Covid in late 2020/early 2021.

Hyperlite Mountain Gear Ultamid 4 with the full inner
Hyperlite Mountain Gear Ultamid 4 with the half inner

When it comes to details it has 8 peg out points along the perimeter, and 7 guy line points half way up. You get a lot of guy line with the tent, but you have to cut it and tie it by yourself. I cut mine in a length of roughly 4 meters, and use a Tautline Hitch at the end, to easily be able to tension the guy lines. With all guy lines pegged, the tent should be able to take quite a beating from the elements. But hard wind will put a lot of pressure on the center pole.

I have a carbon fiber pole from Ruta Loca. It’s lightweight, at 266 grams. I can’t say how well it would fair in extreme weather, but there is also the option to strap two hiking poles together with the HMG pole straps. I use aluminum 4-season poles from Black Diamond, and with a fair share of the poles overlapping the center pole gets really strong.

The tent itself weighs 774 grams for the fly with guy lines, 539 grams for the half inner and 823 grams for the full inner. My pegs weighs 305 gram, and I have a mix of MSR groundhogs, generic Y-pegs and nails.

But the biggest issue probably is the price. In USA the price is $890-$975 for fly, $405 for the half inner and $510 for the full inner. In Europe it’s even more expensive with 1141€-1238€ for the fly, 486€ for the half inner and 624€ for the full inner.

Another downside with a Mid with a full inner is that in a downpour it’s hard to not get a lot of water inside the tent while entering and exiting. When I camped with my daughter with the full inner in 12 hours of torrential rain it was a pain.

But do I like it?

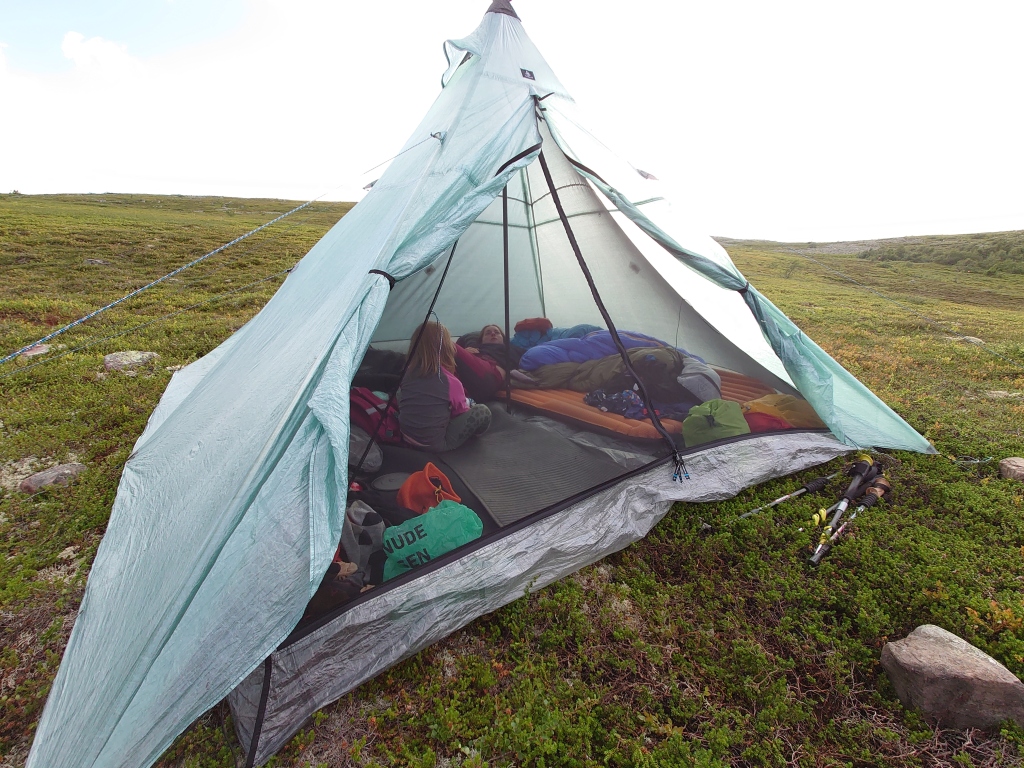
I do, despite some downsides I feel that it’s the best compromise there is for my needs, which is lightweight, large enough for four persons but light enough for one to carry. And despite the downsides with the full inner in rain I do really like the modular approach. I think it really shines when used as a palatial 2-person tent. With the half inner as a fairly large area secured from bugs and the other half as a vestibule with a groundsheet, for cooking and gear. And with only the half inner you could enter and exit without having a swimming pool in your inner tent.

Do I recommend it?

It’s not a tent for everyone. Is a bit more complex to set up than a regular tunnel- or dome tent, it’s very expensive and DCF is bulky and not very resistant to abrasion. But if you prioritize having a large tent that can handle rough weather to a really low weight I do recommend it. For me, the benefits outweighed the downsides, and I would rate it a 4 out of 5 stars.

Hyperlite Mountain Gear Ultamid 4 at Fulufjället National park

Gear walkthrough from our Fulufjället hike

I’ve tweaked my gear over the years, but the thing that’s changed most of the times is probably the tent, since I never seem to find the perfect one, and still haven’t. Having a lightweight setup felt more important when hiking with my family. I carry most of my daughters gear, and I also wanted to carry more of the shared gear since I wanted Maria to be as comfortable as possible since she’s not as used to hiking as I am.

(Disclaimer: Below list contains affiliate links, which means I get a small commission for purchases made through the links. The gear is bought with my own money though.)

Backpacks

I used my Hyperlite Mountain Gear Southwest 4400 (int) (SE) with the pack pods (int) (SE). It’s a good roomy pack that’s more or less waterproof. It feels durable, and I’ve had it a few years without any issues. I really like using it with the pods to fully utilize all the space and I like the roomy front pocket.

Maria used the Exped Lightning 60 with the optional front pocket. It was my first lightweight backpack, and it is super comfortable. I seam sealed it on the inside to get it a bit more waterproof. The bungee straps on the front pocket is getting a bit stretched out, but other than that it’s in good shape. It’s a really great pack, and since it has an adjustable back height Maria can use it too.

C used a Bergans Lilletind 12 rolltop. They sell them with top lids too, but I prefer roll tops as it’s a lot easier to compress the pack when you’re not carrying that much. It has a waist belt, but it’s important to remember not to pack too heavy for a kid, even if it fits in the backpack.

Tent

We used Hyperlite Mountain Gear Ultamid 4 (int) (SE) with a full inner (int) (SE) and a Ruta Loca center pole. I’ve had quality issues with my tent (probably because it was made when they had a record high demand and was getting behind schedule), and using a mid with a full inner in a downpour means a good likelyhood of getting rain in your inner. But despite the downsides I was very pleased with the tent.

It has a large footprint, but since it is that large, and use a tall center pole it has a lot of usable space inside. It was very welcomed at our second campsite, as it was swarmed by mosquitoes. I like to spread out too, so using it for 2 adults and 1 kid was perfect.

It’s also very lightweight. I haven’t weighted mine, but the official weight is 657g for the fly, 765g for the inner and 271g for the center pole. I think my mix of groundhogs, shepard hooks and nails weigh 200g. It’s a 4 person sub 1900g shelter, and you could save 250g if you ditch the center pole and use pole straps (int) (SE) and hiking poles instead.

When we had our camp set up we used half the inner for mine and Marias sleeping pad, 1/4 of the inner for all of our gear and 1/4 for a CCF-mat for C, where we also could sit, cook etc.

Sleeping pads and pillows

Me and Maria used an Exped Duomat HL LW. It weighs 1155g, so the UL-purists might frown upon the LW-part but it is definitely worth it in my book. It weighs more than two UL pass, but with a size of 200x130cm and two separate air chambers it’s a very comfortable pad, and it takes up half of the inner tent. I think this is as comfortable as it gets when sleeping outdoors.

We brought my Exped Winterlite HL for C, but she kept rolling off, so she used a CCF-mat instead, and preferred that.

As a pillow I used Hyperlite Mountain Gear Stuffsack pillow (int) (SE) with my Cumulus Incredilite Endurance downpuffy (int) (SE) and extra socks stuffed in it. It’s fairly comfortable. Maria used a Thermarest Compressible Pillow, that is quite heavy and bulky, but probably one of the most comfortable hiking pillows there is.

Sleeping bags

I used my Cumulus Quilt 450 (int) (SE)and I love it. I had their first generation quilt, but never liked the strap system. With their updated models they fixed the issues I had and I really like it. It’s lightweight, warm and flexible, as it can open up as a square quilt, or strap up a foot box.

My wife used an Aegismax G1. I’ve washed it with Nixwax Downproof to make it more moist proof, and it is well worth it’s money. It’s warm and light and a good choice for someone on a budget, or buying for someone who rarely uses it like my wife. But if that’s not the case I do prefer Cumulus and supporting local high end manufacturers.

C uses a Cumulus Junior 250. Originally they use 750cuin down in their Junior bags, but they make them for order, and I ordered C:s with 850cuin down instead, to get more loft with the same weight. She’s never been cold in it, but when we’re winter camping she sleeps in a fleece base layer and I usually bring a quilt to throw above the back if she would get cold.

Stove set

I have a lot of stove sets, and a nostalgic love for Trangias. I did consider bringing my Trangia 27HA but in the end I didn’t want to carry all that weight. So I used my Toaks 1350ml pot (115g) (int) (SE), an Evernew titanium frying pan (155g) and a Firemaple 117T burner (104g). It’s really lightweight but a large enough pot for us, and a frying pan for pancakes or falafel. Since the hike I bought a Soto Windmaster (int) (SE) that I’ve heard a lot of good things about.

Conclusion

I was happy with the gear we used, and I don’t have any complaints. I do look forward to trying the Soto Windmaster, as I’ve read that its a very efficient stove even in wind. The sleep system is dialed in and I also think it’s hard to get a better setup with the tent, since I like to keep the weight down while still having a lot of room to spread out. In general I’d say my gear is as dialed in as it gets. I have considered a couples quilt, but I don’t know if it would be worth the money, since Maria doesn’t join us that often. I have also considered buying the Thermarest Compressible pillow in the large size for me, but it’s really heavy and bulky, and I think I’ll just stick with the stuff sack pillow.

My favorite internet hikingspots

Hiking and outdoor activities in general is my main interest, and when I’m not hiking or planning trips I like to feed my interest from various sources online. Here’s a list of a few of my favorite websites and blogs:

Brian Outdoors

I’m a frequent reader of Brians blog, and he recently started to post trip reports on YouTube too. Brian is an Australian/Danish guy who hikes a lot in Sweden, and is soon reaching the end of his goal to section hike the whole 1186km of Skåneleden in southern Sweden. His page was one of the first ones I started to read frequently after I started to get interested in UL hiking, and his gear choices has inspired me several times. If you need detailed trip reports or info about Skåneleden, this is the place to go.

Olympus Mountaineering

Together with Brian Outdoors, this is one of my most visited blogs. Olympus Mountaineering contains a lot of detailed information about hiking and mountaineering in Greece. The trip reports contain detailed information about routes, with lots of photos, and different maps. The site also has detailed gear reviews. Whether you plan to hike in Greece or not, Olympus Mountaineering is well worth a visit.

r/Ultralight on Reddit

I started to read the Ultralight subforum on Reddit about a year ago, and now I’m a regular visitor and occasional poster on the forum. r/Ultralight is a great source of information when it comes to gear, and how to shed weight. They have an excellent Wiki with lists of gear companies, Ultralight/ultracheap gear lists etc. But what ever you do, don’t let them know if you’re in to bushcraft… they really hate bushcraft.

Utsidan

Utsidan has Swedens largest outdoor forum, but also contains articles, blogs and contests. I mostly visit the forum, either for asking questions specific to Sweden / Norway, or to answer other peoples questions.

Hyperlite Mountain Gear blog

I really like the gear HMG makes, and a part of me regrets selling my Ultamid 2. But I would need a sponsorship to afford one again. HMGs’ blog contains posts from different authors, with interesting trip reports and videos. Since their gear is often used by multi sport adventurers it contains a lot of info from trips in places like Alaska or below the rim of Grand Canyon and with packrafts or fatbikes / mountainbikes.

Section hiker

One of the largest, in not THE largest outdoor blog on the Internet. Philip Werner is one of my role models, in the way he quit his job and started to make a living on his main interest – hiking. He writes a lot of gear reviews, and have a lot of contests where he hands out gear to the winners. I don’t read every post, but I regularly visit his page and read a post or two.

The hiking life

Cam Honan is sort of a legend in the hiking world, after his 18 months / 15 000 miles “12 long walks” hike. His site contains a lot of trip reports from all over the world, and its a great source of information when it comes to hiking, trip planning and gear. Every new hiker should pay a visit to his site before heading out.

Adventure archives

I’ve written about this YouTube-channel before, and it’s still my favorite. I am a gear nerd and a gram geek, and their videos contains nothing of that. But they make really beautiful movies, and I like their style of film making, with the self composed music, the narratives and the educational aspect when it comes to plants. There’s also a nice dynamic between the four guys that makes the films and the full length episodes are really enjoyable.

Occationally visited, but well worth reading

Sobo-Hobo

Written by Ashley Hill, one of the adventurers sponsored by HMG. Though not updated anymore, the blog has interesting trip reports and beautiful photos. Reading about how she slept in the desert without bug protection was the thing that made me fight my bug phobia and sleep without a bivy.

The big trip

Not updated so frequently lately, but Christine is a really cool person who’s basically been living outdoors for years, on the trail, on a bike or paddling.

Vandringsbloggen

Sweden’s largest hiking blog, run by another one of my role models, Angeliqa Mejstedt, who found a way to make a living from her passion. She recently released the book “Vandra” (Hike), and her site contains trip reports, tips and philosophy about hiking and hikers.

Lighterpacks/Andre Östergård

I found this blog when I searched for info about HMG Ultamid, and found this nice video from Jotunheimen. His page remains one of those I visit somewhat frequently.

UL comfort

This was one of the earliest blogs I started to read when I first got interested in UL hiking. I liked his philosophy about shedding weight but keeping it comfortable. Kenneth, who writes the blog, recently bought Backpackinglight.dk, a nordic webshop with ultralight cottage gear.

Storminstove alcohol stove system

I just received my stove system from Storminstove. Storminstove is a small UK based business, and the closest resemblance would be the Caldera Cone.

Storminstove

I bought a set with a cone, that serves as both a wind shield and a pot holder, a ground reflector and a stove. Everything together weighs 70g.

Storminstove

The cones are made to order and you can give the dimensions of your pot on the webshop, but he already has templates for a lot of different pots.

I have the Toaks 700ml UL pot with thinner titanium. I didn’t have to state any measurements, but he already had a template for my pot. The communication was great, and he answered all my questions in a very short time, even during the weekend.

StorminstoveStorminstove

The cone is made of two parts, that you put together using rivets on the lower part. The pot fits tightly in the cone. The stove has a capacity for 30ml of fuel, and the system is estimated to boil 450ml of water on 15ml of fuel. With three boils per day you only have to use 45ml per day. On my average two-night trip I have five boils, which means a fuel weight of 75g. The lightest gas canister weighs 198g full. I also like that alcohol stoves are quiet.

Storminstove

Everything nests in the pot and my complete system with the Storminstove-set, pot, spoon, fire steel and mini bic weighs 225g.

I’ll write a review as soon as I’ve used it enough.

Trangia stove system – a walkthrough and review

If you’ve grown up in Sweden with any sort of outdoor experience it’s highly likely that you’ve come across a Trangia stove. The company started in 1925 with regular cooking utensils, and in 1951 the first prototype of the Trangia stove system was launched.It’s far from a lightweigh stove system, but it is very windproof, fuel efficient and relatively safe to use around children. The stove consists of a frying pan, two pots, a gripper, an upper and lower windshield and the burner. The standard burner is an alcoholburner, but you can also get the set with a canister gas burner. The gas burner is also sold separately. You can also use the Trangia with the Multfuel X2 burner, witch uses kerosene, gasoline or canister gas amongst others.

Sizes

The series are the 25-, the 27-series and the Minitrangia. There are three different sizes, and a lot of different options to choose from, with regular aluminum, Hard anodized aluminum, duosal (outside aluminum, inside steel), non-stick or with a kettle.

Trangia stove setsTrangia stove sets

Burners

The spirit burner weighs 110g. The gas burner weighs 180g and the Multifuel burner with everything included weighs 525g. All burner can be used in the 25- and 27-series, but the Trangia Mini can only use the spirit burner. With a Trangia Triangle (stove stand 112g) other burners can be used with the Trangia Mini too.

img_0513.jpg

25-series

The 25-series is the largest one, suitable for 3-4 persons. It has a 1,5l and a 1,75l pot. The windshields of the 25 series weighs 200+120g, the pots weigh 110+115g, the frying pan weighs 110g (165g for the non-stick) and 48g for the gripper. The strap that holds it together weighs 20g.

27-series

The 27-series is the medium sized system, suitable for 1-2 persons. It has the same basic components as the 25-series, but everything is smaller, and it has two 1l-pots. The windshields of the 27-series weighs 170+90g, the pots weigh 80g each, the frying pan weighs 85g (120g for the non-stick). The gripper and the strap weighs the same as with the 27-series.

Mini Trangia

The Mini Trangia consists of a spirit burner, a pot stand, a 0,8l pot, a non-stick frying pan and a gripper.

The pot stand/windshield weighs 50g, the pot weighs 92g, the frying pan 76g and the gripper weighs 18g.

Setup

You set up the stove with the vent on the lower windshield facing the wind. This drives the wind up through the windshield providing oxygen to the burner. If you face it in the opposite direction the air will be drawn out of the windshield and pull the flame and the heat down, with a risk of melting the windshield.

Trangia 25UL, Trangia 27ULHA, Trangia MiniTrangia 25UL, Trangia 27ULHA, Trangia Mini

Put the burner in the hole in the lower wind shield, and fasten the upper windshield on the lower. If you use a gas burner or a Multifuel burner, pull the tube through the big hole on the side of the lower windshield.

The upper windshield has three pot holders. When they’re flicked down, they hold the pots inside the windshield. You flick them up to use with the frying pan.

Trangia 25UL, Trangia 27ULHA, Trangia Mini

Using the Multifuel X2

The Trangia Multifuel X2 can be used with gasoline, diesel, kerosene, canister gas, well basically any fuel. You put the burner in the hole in the bottom windshield, and put the hose through the larger hole on the side of the windshield. Connect the stove to pumpbottle and pump it 20-25 times if the bottle is full. More times if there’s less fuel in it. The bottle is marked with an on and an off sign on each side. If you use liquid fuel you first need to prime the stove. Make sure the on-sign on the bottle faces up and turn on the valve for a couple of seconds and then close it again. Then light the stove. When the flames have almost died out, slowly turn on the valve to let more fuel out. If the stove is hot enough you should get a nice blue flame. To put the stove out, turn the bottle around, so the off-sigh is facing up. The fuel in the tube will burn up, and it will depressurize the fuel bottle. Close the valve after this, and unscrew the bottle.

My usage

There is something almost sentimental about the Trangias. It’s the first stove I’ve used, as a boy scout lending my parents stove. For a long time I basically though it was the only stove out there.

I bought the 25-series on my first hike in Norway. I really had no idea that there where different options at the time, and thought everything Trangia was the same. So I went on a hike, using a stove-set for 3-4 persons for just boiling water for freeze dried food. I do still use it however, when I’m out with the family on day hikes or car camping tips.

The Trangia Mini was the second stove I bought, and my first lightweight stove.

I wanted to use a gas canister stove instead and didn’t come to use the Mini that much. It is however compact and fairly lightweight. I do recommend a separate windshield, since the pot stand is only a windshield by name.

I bought the 27-series and the Multifuel X2 burner when I planned to go to Greenland, where it can be hard to find gas canisters. I wanted the hard anodized aluminum since they doesn’t scratch as easy, and you could use sand and other stuff like that to clean it out. I haven’t used it that much, but it has come to use when I’ve been out in the colder seasons. I should have brought it when I was in Tresticklan in January, since it was too cold for my gas, and I barely could get a flame.

I like the stoves. They’re really stable, and the windshields makes for a very fuel efficient burn, even in very windy conditions. The stability makes them good when you got small kids around. They’re suitable for real cooking. The negative thing with them is the bulk and the weight. If you don’t do any real cooking, but just boil water, there are a lot lighter options. I mostly use my FireMaple 116T (48g) with a Toaks 750ml pot (113g).

The gram geek in me has a hard time recommend them, but there is something with Trangias that just makes me want to use them. They are really good quality, and if weight isn’t a priority, or you like to expand your outdoor cooking to more than just boiling water, I’d recommend them. I do prefer the hard anodized aluminum version though.

Cumulus Junior 250 – first impressions

I’ve been looking for a dedicated sleeping bag for my youngest daughter. She’s two years old, and I have bought cheap Aegismax quilts and sleeping bags for the rest of the family. But since C is a lot smaller, and basically the only family member that likes to join me in the woods (Outside of car camping), I thought I’d get her a dedicated kids sleeping bag.

The Cumulus Junior comes in two versions, the 150 and the 250, which states how much down it has in it. They both come with 700cuin down as standard. The 250 has a comfort temperature of 9°C. The fabric is made from 35g/m2 Pertex Quantum. I prefer the thicker 35g/m2 to the 27g/m2 that I have in my Quilt 350. Especially since it’ll be used by a kid that might not go so easy on the gear.

I made a custom order of the 250 with 850cuin down. This gives it an estimated comfort temperature of 5°C, according to Cumulus. With a thick fleece base layer I think it’ll be ok down to freezing. She has always slept really good outside, in her stroller, with just a thick base layer and a knitted wool blanket. I could also bring the Aegismax Wind Hard Tiny as an extra layer over the sleeping bag for insurance.

img_0501

Since it was a custom order it took a few weeks for it to arrive. As with my other products from Cumulus it has a feeling of high quality, and it lofts up fine. There is a tag on the baffle along the zipper that states the cuin of the down. It comes with a small stuff sack, and a larger mesh storage bag.img_0490img_0491

In the foot end there’s a draw cord. You could stuff the lower end of the sleeping bag into itself, and close the draw cord. That way you get a shorter sleeping bag, with less air to heat up, that is suitable for smaller children.

img_0492

Cumulus Junior 250

The weight of the sleeping bag is 520g. It suitable for kids up to 140cm.

As it is now I’m just waiting for the temperature to warm up a bit before I bring C along again. Winter still holds a firm grip of Sweden, and night temps dropped down to -16°C just a few nights ago. I don’t want to risk exposing her to those temps, and give her memories of he outdoors as the place where you’d freeze your ass off.

Exped Lightning 60 – review

I bought the Exped Lightning 60 in October 2015, and it was my first lightweight backpack. I bought it as a replacement for my previous backpack, a traditional pack that weighted around 3kg.

Exped Lightning

This pack is made from a 210D ripstop nylon with a 1500mm water column. It’s not considered to be waterproof, but water repellent. The seams aren’t sealed either, so you need waterproof stuff sacks or a waterproof liner, like a track bag. You could also use Mcnetts seam grip to seal the seams.

img_8587
The pack turned inside out for seam sealing

The Exped Lightning is a clean backpack without many bells and whistles. It has a large main compartment, with a small mesh pocket inside. On the opposite side of the mesh pocket there’s a pocket with solid fabric that can be accessed from the outside, through a waterproof zipper. There are also two hip belt pockets and two mesh water bottle pockets on the sides. That’s it. Exped also offers an optional shove-it bag that can be strapped in the outside of the pack. It’s got one mesh side and one solid side, and is attached to the pack through four bungee cords with hooks. I use this for rain gear, toiletries and other stuff that I like to have easily accessible. I like the simplicity of the design, and I wouldn’t want or need more pockets than this.

John Bauerleden 2016
Compression straps, adjustable load lifters, and the optional Flash pack pocket.

The pack has a roll top opening, which means you open and close it like a regular water proof stuff sack. Compression straps goes zig zag from both sides of the pack to a strap in the middle. This, and the roll top closure, makes it really easy to expand or compress the size depending on your pack volume. The straps are also long enough to be able to be used for strapping larger gear on the outside of the pack, like snow shoes or a shovel etc.

This is a framed pack, and it uses what’s called a T-Rex suspension system. It has one aluminum stay in the middle. The shoulder pads are attached to the stay, and you can adjust the back length with sliding it up and down if you open up the lumbar pad.

The pack weighs 1170g, which should only deter the most hardcore ultra lighters. The design of it though makes it able to haul loads comfortably up to 24 kg. The size, the ability to strap large bulky gear on the outside, and the capacity to carry heavy loads makes it suitable for longer unsupported trips, and trips that require special bulky gear.

It comes in two sizes, 45l and 60l. I’d recommend buying the 60l, since it gives you the possibility to pack more if you’d need it, but you could still easily compress the pack when you pack less.

I’ve had this pack since late 2015, and used it on a number of trips, both long and short. This is my favorite pack, and it is the most comfortable pack I’ve used. It’s durable, lightweight and has great capacity. I highly recommend it.

My tents, past and present

In my search for the perfect home away from home I’ve owned quite a few tents over the years. Here’s a summary of the tents I’ve owned, and my impression of them:

McKinley 3p tunneltent

I don’t remember the model name (similar to this one), but I bought it in 2005 to use while camping with the family. We only got to use it for a couple of nights before it was stolen from the storage in our apartment building.

Bergans Compact 3

OLYMPUS DIGITAL CAMERA

A three person tunnel tent made from PU nylon. It was the first tent I bought when I got interested in hiking again in 2014. It was heavy with its 3800g, cramped and only had 100cm of headroom, with even lower roof in the foot end. I used it on a few hikes, both with a friend and with my daughter, but I ended up selling it. The weight and bulk off it didn’t match the interior space, and it was too low inside to be comfortable, especially with more than one person inside.

Luxe Outdoor Sil Hex peak

WP_20160528_17_43_56_Pro 1

I bought this tent as my first solo tent. I had recently found out about UL hiking and wanted something lighter than my Bergans Compact. I could use my trekking poles as the center pole, it was fairly cheap, and I liked the tipi style. I had a half-inner to shield me from the bugs, and the other half for all my gear. It was a bit short however, and sometimes my sleeping bag got wet from touching the rain fly. They upgraded the model in 2015, making it a bit larger for the European market, and adding an optional two person inner and a separate floor. I used it on quite a few trips, and overall I was happy with it. The inner felt a bit cramped at times, and setting up the inner and the outer separately was a bit of a hassle at times. I sold it when I bought the Hyperlite Mountain Gear Ultamid 2, but I still recommend it as it’s a nice, lightweight, modular and price worthy tent.

Luxe Outdoor Sil Twin peak

IMG_20160304_174218

I bought this one to get an UL tent for two people, in case I’d bring my daughter or my wife with me. I’ve used it by myself on a couple of occasions, and this summer my wife and oldest daughter used it on Laxaleden while me and our youngest daughter used the Ultamid 2.

I don’t really like it. I can’t say anything specific, but it just didn’t feel right. I’ve thought about selling it and buy a 3F UL Gear Cangyang 3 instead to have lightweight options for the whole family. But I don’t know if I’ll be able to persuade the rest of my family to go on hiking trips with me, so it might be unnecessary.

Hilleberg Enan (Kerlon 1000 version)

IMG_8267

I wanted to try a Hilleberg, and with their Enan model the weight finally appealed to me. I bought it with a foot print that covered both the inner and the vestibule.

At first I really liked it. The quality was impeccable, and I realized why they get that much praise. I thought it would feel a lot more cramped than it did and was pretty happy with it at first.

Condensations did however make it sag a bit, and my sleeping bag touched the foot end, and I had fabric really close to my face.

When I used it in Jotunheimen in 2016 it stood up to some severe winds. But the winds also made me see the downsides of having such a small tent. The wind pushed the fabric in and compressed the already small interior a lot. The worst night I had fabric pressed against either both sides of my feet or on my face and back.

All in all, I think it was a really good tent, but I wanted more space and ended up selling this one too. If you don’t mind the downsides I recommend it. You could hardly get better quality than Hilleberg.

Hyperlite Mountain Gear Ultamid 2

20170807_195214393_iOS

I’ve had my eye on this one for a long time, even before I bought the Hilleberg Enan. Eventually I made up my mind and bought it. I wanted more space than I had in my Enan, and I also wanted to try Dyneema Composite fabric. The weight, size and material made me take the plunge and buy it. This was my first use of a one walled floorless shelter. I also bought a Gossamer Gear polycro groundsheet and a Borah Gear bivy. Bugs and the thought of getting flooded worried me, and after I bought it I practiced  site selection a lot while hiking to get a better eye for suitable locations that wouldn’t get flooded.

The first times I used it, I also used the bivy. But after a couple of nights my fear of bugs subsided and I used the tent without the bivy.

The Ultamid 2 had gotten a lot of praise about its robustness and its quality. I wouldn’t say that quality is a special feature though. At that price I wouldn’t expect, or accept, anything other than really high quality.

The tent was well made, lightweight (albeit heavier than advertised), and stood up to severe winds without breaking a sweat. I liked that it didn’t sag when it got wet, and I really liked the interior space, compared to the Hilleberg Enan. It’s also quite photogenic :-). I can’t say anything specific that I didn’t like about it, but it didn’t feel perfect for me. I sold it when I bought the next tent on my list.

Tentipi Olivin light

20171027_112105431_iOS.jpg

I bought this tent because I like the tipi style tents, I wanted to be able to use a fire inside and I liked the snow skirts that prevented a cap between the fly and the ground. Being made from Silpoly it doesn’t sag as much as Silnylon when it’s wet.

It was love at first sight. The tent is heavier than the Ultamid 2, but the weight includes a dedicated center pole, that can be replaces with two trekking poles for weight reduction. It had a nice venting system that’s controlled through lines going down the center pole. No need to even get out of the sleeping bag to open or close the vents. It’s fire retardant and you could have a small open fire inside. It doesn’t have a dedicated floor, and I had a mail-conversation with Tentipi, and they don’t plan to make one either. The 3F UL Gear Cangyuan 3 (AliExpress tent) has a floor with the same dimensions that costs ~25€, and I bought that one to use with it. I only wish that the floor could be opened up for the use of a fire inside.

I think I found the perfect tent for me. It’s a subjective feeling, but I really liked it from the start. For once I’ve stopped looking for other tents and feel like I found the one I’m going to keep. I know this might change though, but I hope I’ll stick to this one.

Family tents

Mc Kinley Alpha 4

The family bought this one for camping when our first Mc Kinley tent got stolen. It’s similar to this one, but a four person version. When we bought it I hadn’t started to hike yet, and didn’t know a lot about tents and outdoor gear. It’s a heavy camping tent, and we’ve used it on a couple of occasions, but it’s mostly being used by my oldest daughter and her friends for camping in the backyard during the summers. I can’t say I like anything about it for my intended use, but as a wear and tear tent for the kids it’s perfect.

Helsport Nordmarka 6

20170716_023536553_iOS

We planned to do a bike-camping trip this summer, and wanted something a bit lighter, and bigger than the Mc Kinley tent. The sports chain XXL had a sale, with 25% discount on all their tents, so we bought the Nordmarka 6 with a floor. It’s Helsports cheapest tipi, made specially for XXL but we really liked it. It was large, with 250cm of headroom and a diameter of 450cm. It could easily hold out entire family with lots of spare room left.

The pegs were simple heavy folded tin, that bent easily. I bought lighter aluminum tri-pegs from AliExpress instead. The center pole was also heavy steel, and I bought Helsports aluminum center pole instead. It was for another one of their tipis, and 5 cm too long, but I sawed it off. This way I could shed quite a lot of weight off the tent.

I really liked this tent for family trips. It’s large, easy to set up, you could have an open fire or a stove inside, and it also looks good on photos :-). It seems like Helsport stopped making them, but if they start selling them again I strongly recommend them as they are really price worthy.

Hyperlite Mountain Gear Ultamid 2 – First impressions

As I’ve wrote before I made some gear changes this spring. The biggest change was a whole new shelter setup. Before, I had a Hilleberg Enan, a great tent that I was mostly pleased with. But I decided to try Dyneema Composite fabric (former Cuben Fiber) and bought an Hyperlite Mountain Gear Ultamid 2, a polycro groundsheet from Gossamer Gear and a Borah Gear Bivy.

I’ve had a 2014 Luxe Outdoor Sil Hex-peak before, but always used it with an inner. This was my first experience with a floorless shelter.

I’ve only done one test pitch in the garden, and after that, used it for one night in the woods. This is not an in depth review of the Ultamid 2, but more a note of my impressions after using it for the first time.

20170322_170507850_iOS.jpg
Test pitch in the back yard the night I got it

When I first received it I realized that Cuben Fiber is quite bulky. Despite being so light, the bag itself was quite large. I weighted it, and the tent, with the extra 100′ of guy line weighs 663g. The tent with three ~12̈́’ guy lines attached weighs 591g. It was heavier than listed, but it really doesn’t matter.

The first thing I did when I received it was to unpack it and check all the seams. Everything was in order, and the shelter really had a quality feel to it. I also made a test pitch in the garden. It was roomy inside, but I think it will take some practice to get the corners in a perfect 90° angle. I think that I’ll be able to fit three people inside, if I offset the pole a bit.

After I took it down I cut the 100′ of extra guy line into eight ~12′ lines. I made a loop, with a taut line hitch, on each line to easily be able to tighten and loosen the guy line. I tied three guy lines to the center panel guy points using two half hitches. I stored the extra guy lines in a zip lock back. For regular below-tree line hikes I don’t need them. But above tree line, where the wind really picks up, I’ll need all of the guy lines.

On the inside of the shelter there are two D-rings. You could tie a line between them to dry your socks, or use it to strap the shock cord from your bivy to get the mesh off your face, like I did.

20170326_061925310_iOS
The hiking poles are strapped together using HMG Poles straps

20170326_061951973_iOS
There are four guy points in each corner, plus three mid paned guy points. One on each side except on the entrance side

The Ultamid 2 was spacious and bright. I guess my preference in general is to have a darker color that matches the forest more, but I liked how bright it was inside when the morning sun shined through the fabric (and the spruce green was to expensive for me).

I use my hiking poles as the center pole. I strap them together using Hyperlite Mountain Gears Pole straps. It worked better than I expected, and I did get the poles tightly together. But I do consider making a “missing link” or something like that to connect the poles easier. I might buy a spare bottom section to my hiking poles, and cut it to an appropriate length and then use that to connect the poles together.

You could buy both an inner with a floor, and a floorless net inner. I plan to try mine in mosquito infested areas without either before I decide if I need one. I’ll probably go for the floorless one if I decide to get an inner.

After one nights use I’m happy with my Ultamid 2. It’s light, bright, spacious and well built. So far I really recommend it. I’ll write a more in depth review once I’ve used it for a while.

Disclaimer: I don’t know if I need to add this, but I buy all of my gear for my own money. There are no affiliation links, but I add the links for convenience of the reader. Should a company offer affiliation links I’ll add information about it in the disclaimer.

Adventure Archives, my favorite YouTube-channel

There are a bunch of YouTube-channels I regularly watch. Outdoor Adventures, Sintax77 and Burly Outdoors are a few of them. These are the traditional style hiking videos, with one guy filming, most of the time while walking. I like all of them, especially Outdoor Adventures.

But my no. 1 favorite channel so far is Adventure Archives. Adventure Archives is three, sometimes four guys, making one hour long films about once every other month. Anyone who’ve read my blog for a while knows that I’m somewhat of a gram geek and a gear junkie. Adventure Archives is the strait opposite of this, and I guess that’s part of what I like about it.

Adventure Archives is really nothing about gear or weight. If you’re an UL hiker, it might seem sacrilegious to carry food it heavy glass jars and carry tin canned food. But their films are more about the core of hiking, more about the spiritual part and the connection to nature instead of focusing on what we wear and what we carry while in nature. (I really like videos that focus on the gear-part too 🙂 )

The filming itself is very professionally done, and they seem to haul a ton of filming gear each episode. But it’s done in high quality, both technically and esthetically. They also have narration in the films that really adds to the quality and the feeling. They also make their own soundtrack, which has a sort of Final Fantasy VII vibe to it.

If you have to have spectacular views, like the High Sierras, Jotunheimen or Alaska to like a hiking video, these films might not be your cup of tea. But I do recommend them, and these guys can really show the beauty of nature even on shorter hikes.